






















































































































































12 Plyometric Exercises for Speed at Home: A Practical Guide for Beginners
Author: RVLNSV PRASAD
Updated On: October 2026
About Us
Author Bio
Editorial Policy
Contact Us
Introduction
Improving speed is not only about running harder. It also involves how quickly you produce force, how well you control your body, and how efficiently you move from one step to the next. That is why plyometric exercises for speed at home can be a useful addition to a fitness routine for people who want to run faster, jump more confidently, or improve performance in sports.
Plyometric training uses quick, controlled movements such as hops, jumps, and bounds. These exercises challenge the muscles to absorb force and produce force rapidly. You can perform several beginner-friendly versions without a gym, although you still need enough space, a stable surface, and appropriate progression.
Research supports the potential value of this training method. A 2023 umbrella review of 29 meta-analyses found that plyometric training can improve several physical performance measures, including sprinting, jumping, and strength. However, the researchers also highlighted limitations in the quality of some underlying evidence. You can read the full open-access review of plyometric training and physical performance.
The important point is that more jumping does not automatically mean more speed. Your training needs to match your current ability, sport, recovery, and movement quality. A beginner who learns to land quietly and consistently may be better prepared to progress than someone who immediately attempts high box jumps or repeated maximal bounds.
This guide explains 12 exercises, how to perform them, which variations suit beginners, and how to combine them in a simple four-week plan.
Quick Answer: Which Plyometric Exercises Help Improve Speed?
Plyometric exercises that involve controlled jumping, hopping, and forward movement can help develop explosive power relevant to acceleration and other athletic actions. Useful options include squat jumps, pogo hops, standing broad jumps, skater hops, and low-amplitude forward hops.
Beginners should first learn to land with control and tolerate basic bodyweight exercise. Start with a small number of quality repetitions, allow enough recovery between sets, and stop when your technique deteriorates. Plyometrics can support speed development, but they work best alongside suitable sprint practice, strength training, and recovery.
Key Takeaways
- Plyometric training develops the ability to produce and absorb force quickly.
- Begin with low-amplitude movements before progressing to demanding jumps and bounds.
- Choose exercises that match your goal: forward jumps for horizontal force, vertical jumps for upward force, and lateral hops for side-to-side control.
- Rest enough between sets to maintain movement quality.
- Two short sessions per week can be a reasonable starting point for healthy beginners who tolerate jumping well.
- Avoid training through sharp pain, joint instability, or repeated poor landings.
- Measure progress through consistent performance tests rather than relying on soreness or exhaustion.
What Is Plyometric Training, and How Can It Support Speed?
Plyometric training involves rapid movements that use the stretch-shortening cycle. During this process, a muscle-tendon unit is loaded as it lengthens and then produces force during a shortening action. A familiar example is bending before jumping.
The goal is not simply to jump high. It is to coordinate the loading and take-off phases efficiently while controlling the landing.
The 2023 umbrella review in Sports Medicine—Open found evidence of benefits across several performance measures, including sprint time and jumping ability. The authors also cautioned that many included meta-analyses had limitations, so the results should not be treated as a guarantee for every person.
A separate 2025 systematic review and meta-analysis comparing plyometric and resistance training examined lower-limb explosive power and speed. Its focus highlights an important practical point: plyometric work and resistance training are related but not identical approaches. Depending on your goal, both may have a role in a broader program.
Plyometric training versus ordinary cardio
| Feature | Plyometric training | Steady-paced cardio |
|---|---|---|
| Main emphasis | Rapid force production and landing control | Sustained movement and aerobic fitness |
| Typical examples | Jumps, hops, bounds | Walking, jogging, cycling |
| Effort pattern | Short bursts with recovery | Often continuous or longer intervals |
| Primary training consideration | Technique and impact tolerance | Duration and sustainable intensity |
| Beginner approach | Start with simple, low-amplitude drills. | Build duration at a comfortable pace |
Neither approach replaces the other. Walking and running can develop aerobic fitness, while plyometrics target a different set of movement qualities.
Does plyometric training make you faster immediately?
Not necessarily. Long-term training adaptations are different from the short-term effects of a warm-up.
A 2026 systematic review and meta-analysis on plyometric conditioning activities reported an overall acute improvement in sprint performance across the included studies. The results varied by protocol and sprint distance, and the analysis examined short-term responses rather than proving that one home workout creates lasting speed gains.
For lasting improvement, consider the broader training program. You need consistent practice, suitable exercise selection, and enough recovery to adapt.
12 Plyometric Exercises for Speed at Home
The following exercises progress from relatively accessible movements to more demanding options. You do not need to complete all 12 in one session. Select a few that suit your ability, perform them well, and gradually increase difficulty.
1. Pogo Hops
Best for: Developing rhythm, ankle stiffness, and quick ground contacts.
Pogo hops are small, repeated jumps performed with relatively straight knees and controlled ankle movement. They are more demanding than they look because the aim is to maintain a consistent rhythm without collapsing at the ankles or knees.
How to do them:
- Stand with your feet approximately hip-width apart.
- Keep your torso upright and your knees softly unlocked.
- Make small vertical hops by pushing through the balls of your feet.
- Land gently and move into the next hop only while your rhythm remains controlled.
- Start with a short set rather than trying to jump continuously for a long time.
Beginner modification: Practice a few gentle calf raises and quick heel lifts before attempting repeated hops.
Common mistake: Bouncing higher than necessary. Large jumps can increase impact and make it harder to maintain a quick, controlled rhythm.
2. Squat Jumps
Best for: Developing general lower-body explosive power.
Squat jumps teach you to coordinate a countermovement with a powerful take-off. They are a useful starting point for people who already tolerate bodyweight squats comfortably.
How to do them:
- Stand with your feet around shoulder-width apart.
- Bend your hips and knees into a comfortable partial squat.
- Swing your arms naturally and jump upward.
- Land with your feet stable and your knees tracking in line with your toes.
- Reset before the next repetition.
Start with a low number of jumps. If you cannot land with control, reduce the jump height or practice squats without jumping.
Common mistake: Rushing into the next repetition before stabilizing the landing.
3. Standing Broad Jumps
Best for: Practicing horizontal force production relevant to acceleration.
Standing broad jumps move your body forward rather than mainly upward. They require space, so check that the landing area is clear and non-slip.
How to do them:
- Stand behind a visible starting line.
- Bend your hips and knees slightly.
- Swing your arms and push through both feet.
- Jump forward to a comfortable distance.
- Land with your feet stable and your knees bent.
- Hold the landing before walking back to the starting position.
Beginner modification: Use a submaximal jump and prioritize a stable landing over distance.
Common mistake: Reaching too far forward with your feet and losing balance. A shorter, controlled jump is more useful than an uncontrolled maximum attempt.
4. Low Forward Hops
Best for: Practicing repeated forward movement.
Low forward hops are a simpler alternative to aggressive bounding. They can help you coordinate forward propulsion with controlled landings.
How to do them:
- Stand in a clear, straight path.
- Make a small two-footed hop forward.
- Land softly and regain your balance.
- Repeat for only a few controlled repetitions.
- Stop before your landings become noisy or unstable.
Beginner modification: Perform single hops with a pause between them instead of continuous hopping.
Common mistake: Turning the exercise into a long endurance set. The aim is quality movement, not exhaustion.
5. Skater Hops
Best for: Developing lateral power and side-to-side control.
Skater hops move you from one side to the other. They may be useful for sports that involve lateral movement, but they require balance and knee control.
How to do them:
- Stand with your feet about hip-width apart.
- Shift your weight onto one leg and bend the supporting knee slightly.
- Hop a short distance sideways onto the opposite leg.
- Land with the knee softly bent and your trunk controlled.
- Pause if needed before hopping back.
Beginner modification: Step laterally and practice balancing on one leg before adding a hop.
Common mistake: Letting the knee collapse inward or jumping farther than you can control.
6. Split-Stance Jumps
Best for: Practicing explosive movement from a staggered stance.
Split-stance jumps resemble the position used in split squats, but the jump adds a higher impact demand. They are best reserved for people who already have stable lunges and a basic jumping technique.
How to do them:
- Begin in a comfortable staggered stance.
- Bend both knees slightly while keeping your torso upright.
- Jump vertically with a controlled effort.
- Land in the same stance and absorb the impact.
- Reset before repeating.
Start with a very small jump. Do not switch legs in mid-air until you have the coordination and strength to control the movement.
Common mistake: Allowing the front knee to twist or losing balance on landing.
7. Tuck Jumps
Best for: Challenging explosive power and coordination.
Tuck jumps involve bringing the knees upward during a jump. They are more demanding than ordinary squat jumps and are not necessary for most beginners.
How to do them:
- Stand upright with your feet stable.
- Make a small preparatory bend at the knees and hips.
- Jump upward and lift your knees only as high as you can control.
- Extend your legs for landing.
- Land with control and pause.
Beginner modification: Use squat jumps until you can land consistently without pain or loss of balance.
Common mistake: Pulling the knees up at the expense of a controlled landing. Skip the exercise if fatigue makes your technique unreliable.
8. Low Box or Step-Off Jumps
Best for: Practicing controlled take-off and landing around a low obstacle.
A low, stable platform can provide a clear visual target. However, unstable chairs, stools, and household furniture are not appropriate jumping equipment.
How to do them:
- Use only a purpose-built, stable exercise platform placed on a non-slip floor.
- Begin with a low height that does not require a maximal effort.
- Step down and reset between repetitions unless you have been coached in a suitable jump variation.
- Keep the landing area clear.
- Stop if you cannot land quietly and steadily.
Beginner modification: Jump over a flat line on the floor rather than onto a platform.
Common mistake: Choosing a tall box because it looks more athletic. Height is not a reliable measure of training quality.
9. Single-Leg Hops in Place
Best for: Practicing unilateral balance and force control.
Single-leg hopping places more demand on one leg at a time. It is therefore a progression, not an automatic beginner exercise.
How to do them:
- Stand near a wall for balance support if needed.
- Shift your weight onto one foot.
- Perform one small hop in place.
- Land on the same foot and regain stability.
- Repeat only while the landing remains controlled, then switch sides.
Beginner modification: Practice single-leg balance and supported calf raises before hopping.
Common mistake: Continuing to hop when the ankle wobbles or the knee becomes difficult to control.
10. Alternating Bounds
Best for: Developing horizontal movement and coordination for running-related sports.
Bounding uses exaggerated alternating strides with a flight phase. It is more demanding than ordinary hopping and requires a clear, level area.
How to do them:
- Start with a brisk walk or gentle jog.
- Take a slightly longer, springier step with one leg.
- Drive the opposite knee forward naturally.
- Land under control and alternate legs.
- Keep the distance short until your coordination improves.
Beginner modification: Practice marching with purposeful knee drive and gradually lengthen the stride without jumping.
Common mistake: Overstriding and reaching far ahead of the body. This can reduce control and make the landing harsher.
11. Lateral Line Hops
Best for: Practicing quick changes of direction over a small distance.
This exercise uses a line on the floor as a target. The line can be made with tape, provided it does not create a slipping or tripping hazard.
How to do them:
- Stand beside the line with your feet close together.
- Make a small hop across it with both feet.
- Hop back to the starting side.
- Maintain a steady, comfortable rhythm.
- Stop if your feet begin catching the line or your landings become uncontrolled.
Beginner modification: Step over the line quickly rather than hopping.
Common mistake: Prioritising speed over accurate foot placement.
12. Low Split-Stance Switches
Best for: Coordinating alternating leg positions.
This drill involves changing the position of the feet in a small jump. Because it combines impact with coordination, it should come after comfortable split squats and basic jumps.
How to do them:
- Begin in a staggered stance with a comfortable distance between your feet.
- Bend slightly through the hips and knees.
- Jump just enough to switch the front and rear leg positions.
- Land softly and stabilize.
- Pause between repetitions until the movement feels reliable.
Beginner modification: Alternate reverse lunges without jumping.
Common mistake: Letting the feet land too close together or allowing the front knee to lose alignment.
How to Choose the Right Exercises for Your Goal
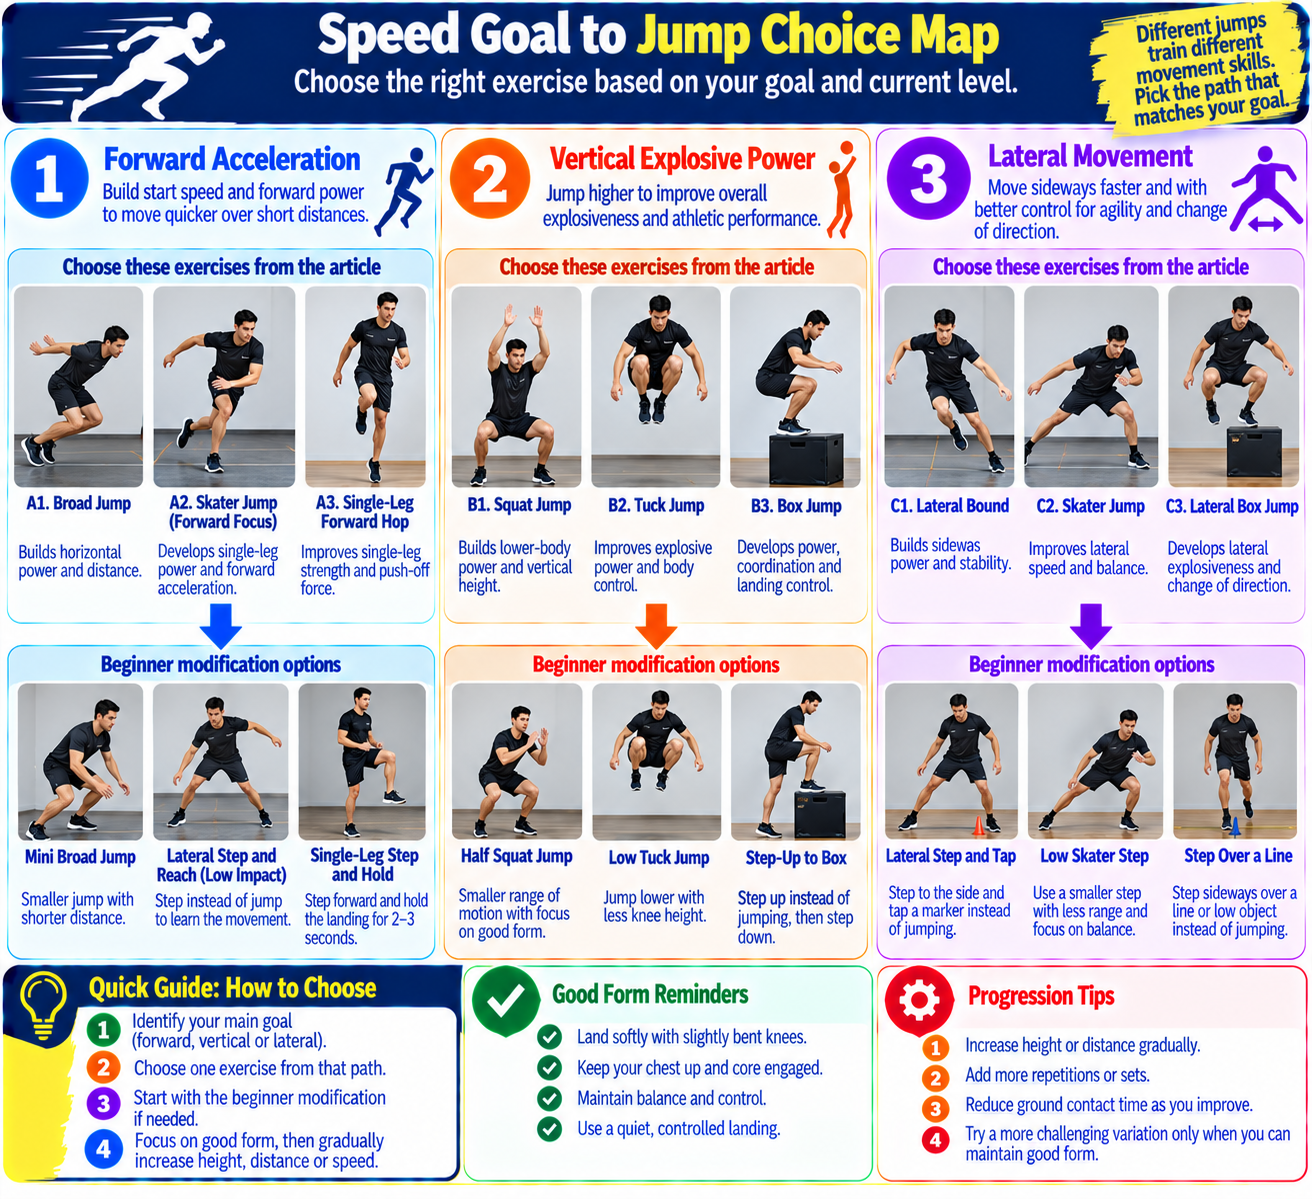
Different plyometric exercises emphasize different movement directions. Choose based on your goal and your current ability, not on how advanced the exercise looks.
| Goal | Suitable starting options | Progression when ready |
|---|---|---|
| General explosive power | Controlled squat jumps | More powerful squat jumps |
| Forward acceleration | Low forward hops | Standing broad jumps or coached bounds |
| Quick ankle contacts | Gentle pogo hops | Slightly longer sets with consistent rhythm |
| Lateral movement | Side steps and balance drills | Skater hops or lateral line hops. |
| Single-leg control | Supported single-leg balance | Small single-leg hops |
| Coordination | Step patterns and split squats | Split-stance switches |
The goal is to select movements that help you practice the quality you want to improve. No single exercise develops every aspect of speed.
A Four-Week Plyometric Training Plan for Beginners
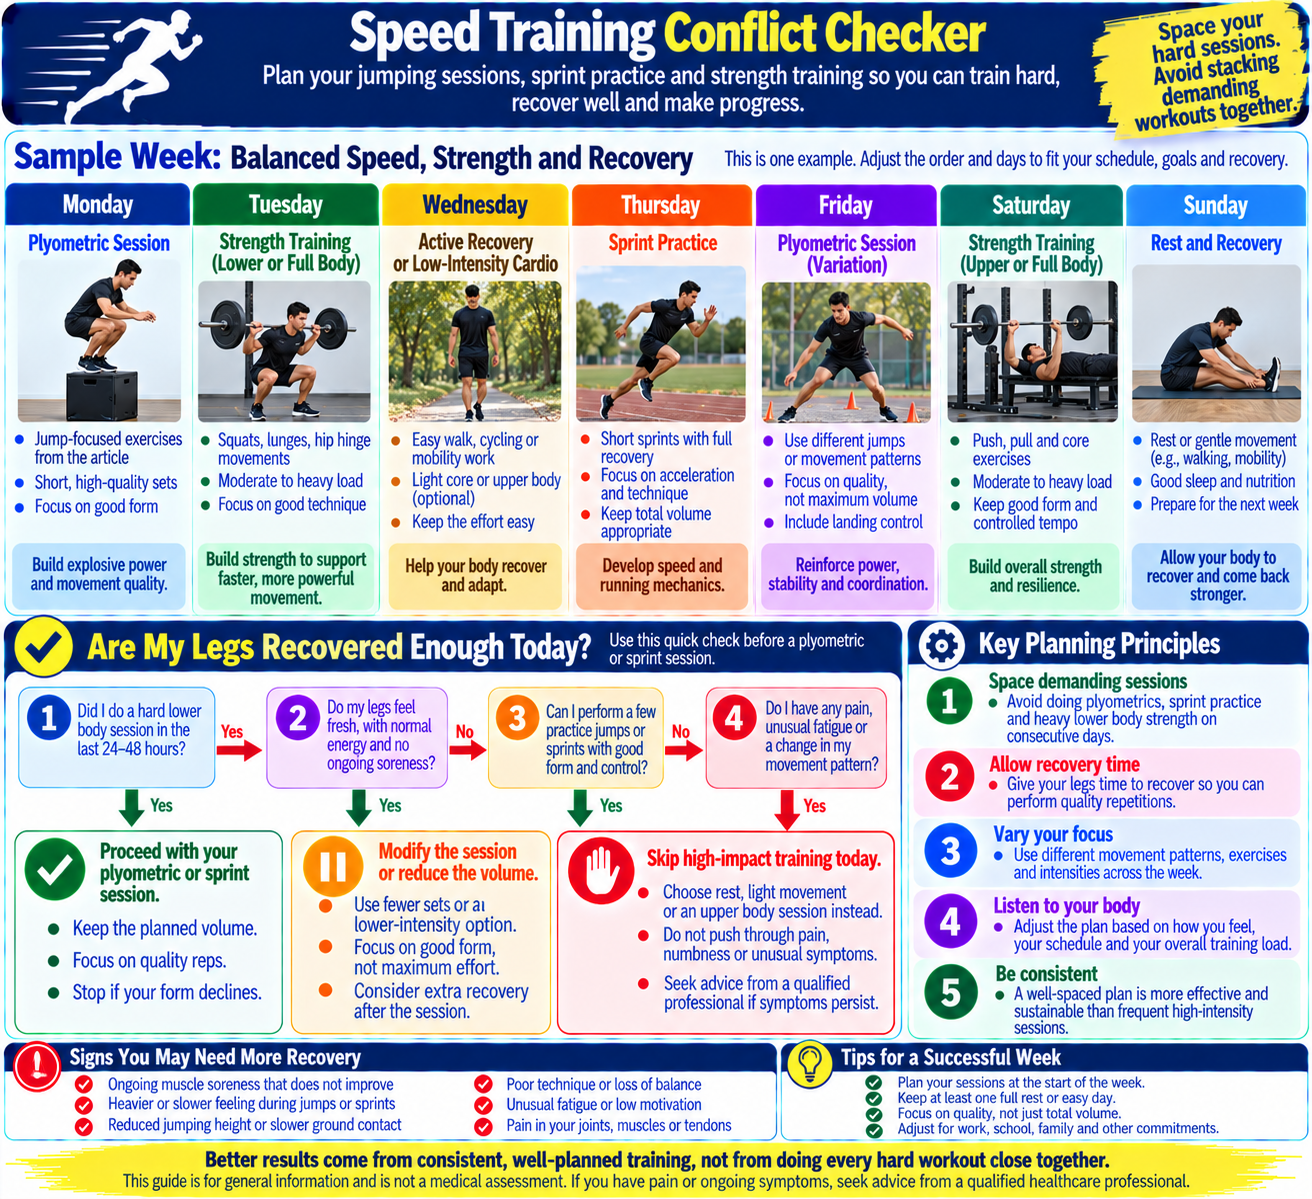
This plan is intended for generally healthy adults who already tolerate normal walking and basic bodyweight exercise. It is a conservative starting framework, not a universal prescription. If you are new to exercise, returning after an injury, or unsure whether jumping is suitable for you, begin with lower-impact alternatives and seek appropriate professional guidance.
Train on two non-consecutive days each week. Leave enough recovery between sessions to see how your legs respond. Avoid adding extra jumps simply because the workout feels short.
| Week | Main focus | Example exercises | Suggested approach |
|---|---|---|---|
| Week 1 | Learn landing and balance. | Squat practice, step-over drills, low forward hops | 2–3 sets of 3–5 controlled jumps where suitable |
| Week 2 | Build consistency. | Squat jumps, low forward hops, gentle lateral line hops | 2–3 sets of 3–5 repetitions per selected drill |
| Week 3 | Introduce direction changes. | Broad jumps, skater-hop preparation, lateral hops | Add only one new or harder movement if recovery is good. |
| Week 4 | Consolidate technique. | Repeat well-tolerated exercises and review performance. | Keep volume stable or increase one small variable. |
These are starting ranges, not targets you must reach. If you lose landing control, experience joint pain, or feel unusually sore, reduce the work or return to a simpler variation. The correct progression depends on your current fitness and response to training.
Example session: a simple home workout
After a general warm-up, choose three exercises from the plan:
- Squat jumps: 2 sets of 4 repetitions.
- Low forward hops: 2 sets of 4 repetitions.
- Lateral line hops or step-overs: 2 sets of 4 controlled repetitions.
Rest for roughly 60–120 seconds between sets, or longer if you need it to restore control. More demanding jumps may require longer recovery. The aim is to make each repetition deliberate rather than turning the session into a breathless circuit.
A practical warm-up can include brisk walking, marching, controlled bodyweight squats, calf raises, and gentle dynamic leg movements. Begin the jumping portion only when you feel prepared and the surface is suitable.
How to Progress Without Increasing Injury Risk
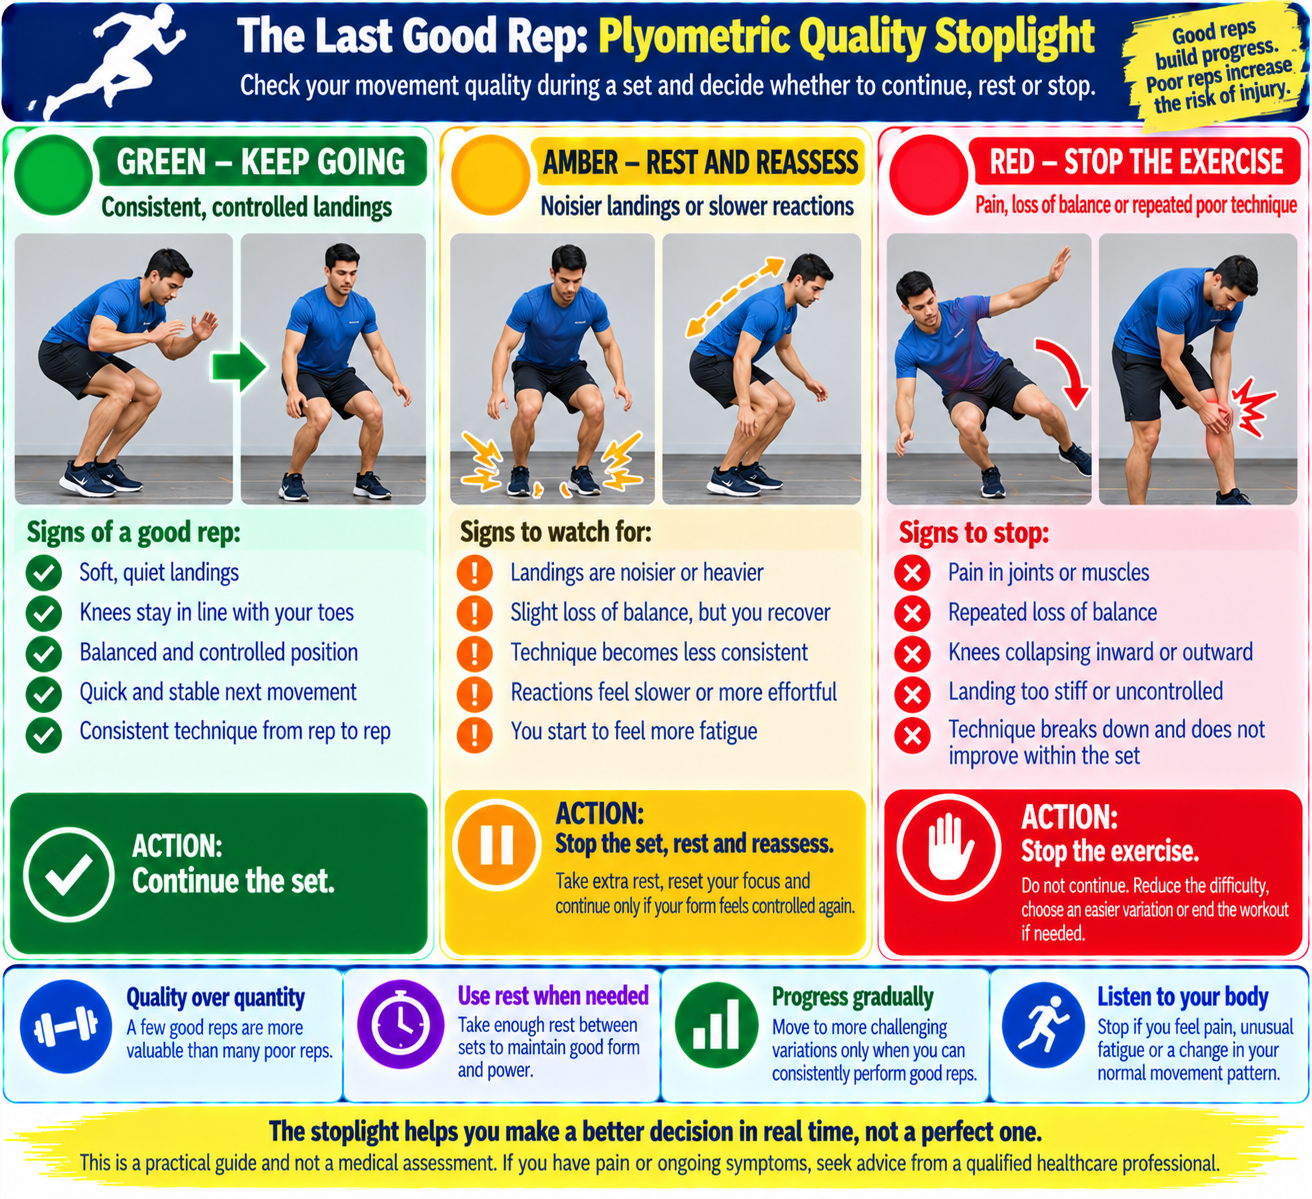
Progression should be based on movement quality, recovery, and tolerance. Do not increase jump height, distance, speed, and total repetitions all at once.
Use this simple progression checklist:
- Control: Can you land without losing balance?
- Consistency: Do the last repetitions look similar to the first?
- Comfort: Are your knees, ankles, hips, and feet comfortable during the session?
- Recovery: Do you return to your normal activity level without lingering or worsening symptoms?
- Readiness: Can you repeat the exercise with good technique in the next session?
If one of these areas is not going well, repeat the current level or reduce the difficulty. Progress is not a race.
Why recovery matters
Plyometric exercise can be physically demanding even when a session is short. Repeated high-impact landings may cause fatigue that changes how you move. Rest between sets helps you maintain the quality of the next repetition, while rest days give you time to assess your response.
A systematic review and meta-analysis of plyometric training across different surface types, published online in December 2025 and in a 2026 journal issue examined effects on jumping, sprinting, and agility. Surface type is one factor researchers study, but this does not mean a particular surface makes all jumping safe. Choose a stable, predictable, non-slip surface and adapt the exercise to your ability.
Common Plyometric Training Mistakes
1. Doing too many repetitions
Plyometrics are not automatically better when you perform more jumps. If the quality of your landing deteriorates, the session has become less useful for practicing controlled explosive movement.
Better approach: Stop the set while you can still land well.
2. Starting with advanced jumps
Tuck jumps, repeated single-leg hops, and long bounds demand more coordination and impact tolerance than simple bodyweight movements.
Better approach: Build basic squat, balance, and landing control before adding harder variations.
3. Using an unsuitable surface
Loose mats, slippery tiles, uneven ground, and unstable furniture can interfere with foot placement and landing.
Better approach: Use a clear, stable surface with enough room to move. Avoid jumping onto household furniture.
4. Turning every set into cardio
When you rush from one repetition to the next, fatigue may affect your landing mechanics. That can undermine the purpose of explosive training.
Better approach: Take enough rest to maintain movement quality. If your breathing or legs have not recovered, wait longer.
5. Ignoring pain
Muscle effort is different from sharp pain, joint instability, or worsening discomfort. These symptoms should not be treated as signs that the workout is effective.
Better approach: Stop the painful exercise. If symptoms persist, recur, or affect normal walking, seek advice from a qualified healthcare professional.
6. Expecting jumps alone to improve every part of speed
Speed also depends on sprint technique, strength, coordination, and the demands of your sport. Plyometrics are one training tool, not a complete replacement for other practice.
Better approach: Combine suitable jump training with sport-specific drills, progressive strength work, and recovery.
A More Useful Way to Measure Progress
Many people judge a speed workout by how tired they feel. That can be misleading. A better approach is to track a small number of repeatable measures.
| Measure | What to record | Why it helps |
|---|---|---|
| Technique | Whether you can land and stabilize | Shows whether movement control is improving |
| Training volume | Exercise, sets, and repetitions | Helps prevent accidental jumps in workload |
| Perceived effort | Easy, moderate, or hard | Gives context for how demanding the session felt |
| Recovery | Comfort and function over the following day | Helps guide the next session |
| Performance | A repeatable jump or sprint test, if appropriate | Offers a more direct measure than soreness |
For a standing broad jump, use the same surface, starting position, and measurement method each time. Record the distance only when you can land safely. For sprint tests, use a consistent distance and method, and avoid frequent maximal testing if you are not prepared for it.
People-first insight: If your jump distance has not changed but you are landing more steadily, that is still useful progress. Better control may help you prepare for more demanding training later.
What Recent Research Says About Plyometric Training
Research generally supports plyometric training as a way to develop several athletic performance qualities, but it is important to understand what each study can and cannot tell us.
Research finding 1: Benefits across multiple performance measures
The 2023 umbrella review of 29 meta-analyses reported improvements across physical performance measures such as sprint time, jump performance, and strength. It also identified limitations in the evidence base, including the lack of control groups in many included meta-analyses.
What this means for you: Plyometric training is a reasonable option to consider, but the best exercise selection and dose depend on the individual.
Research finding 2: Training method and speed development
A 2025 systematic review and meta-analysis comparing plyometric and resistance training examined their effects on lower-limb explosive power and speed. This research supports treating explosive jump training and resistance training as related methods with different characteristics, rather than assuming one always replaces the other.
What this means for you: If your goal is to run faster, do not overlook strength development, running practice, and recovery.
Research finding 3: Short-term effects are not the same as long-term adaptation
The 2026 review of plyometric conditioning activities and sprint performance examined acute responses following conditioning activities. It reported an overall improvement in sprint performance in the included studies, but results varied by protocol and distance.
What this means for you: A particular jumping exercise may influence a warm-up or short-term performance response, but that does not prove it will produce the same effect in every person or replace a structured training plan.
Research finding 4: Surface and exercise context matter.
The systematic review on plyometric training across different surfaces investigated performance outcomes on soft and rigid surfaces. Surface choice is only one part of the training context; movement difficulty, footwear, experience, and fatigue also matter in real-world exercise decisions.
What this means for you: There is no universal surface or exercise that guarantees injury prevention. Prioritise stable footing, manageable impact, and sound technique.
Frequently Asked Questions
How many days a week should beginners do plyometric exercises?
Two non-consecutive sessions per week can be a reasonable starting point for healthy beginners who already tolerate jumping. The right frequency depends on your exercise history, sport, intensity, and recovery. Begin with less if needed and avoid adding sessions while you are still recovering from the previous workout.
Can I do plyometric exercises at home without equipment?
Yes. Exercises such as squat jumps, low forward hops, pogo hops, and lateral line hops can be performed without gym equipment. You still need a clear area and a stable, non-slip surface. Do not use an unstable chair or stool as a jumping platform.
Are plyometric exercises suitable for complete beginners?
Some low-amplitude options may suit beginners, but not everyone is ready for impact-based exercise. Start with bodyweight squats, calf raises, balance practice, and step-over drills if jumping is unfamiliar. Consider guidance from a qualified exercise professional if you have concerns about your movement or physical readiness.
Do plyometric exercises make you faster than running?
They do not replace running practice. Plyometrics may support explosive power and sprint-related performance, while sprint training allows you to practice the actual running skill. The most useful program depends on your sport, experience, and training goal.
Should I do plyometrics before or after strength training?
That depends on the session and your priorities. Explosive exercises are commonly placed early in a workout, after a warm-up, when you are relatively fresh. If your technique or power declines after heavy lifting, separate the sessions or change their order with guidance from a qualified coach.
Can I do plyometrics every day?
Daily high-impact jumping is not a good default for beginners. Frequent sessions can make it harder to recover and maintain movement quality. Start conservatively, monitor how you feel, and leave recovery time between demanding sessions.
Are plyometric exercises good for weight loss?
Plyometrics use energy, but they should not be treated as a guaranteed weight-loss method. Sustainable weight management depends on overall eating patterns, total activity, sleep, and other individual factors. Choose exercises for the performance and fitness benefits they offer, not just the calories you expect to burn.
What should I do if my knees hurt during jumping?
Stop the painful movement rather than pushing through it. Switch to a non-impact alternative only if it is comfortable, and seek professional assessment if pain persists, returns, or affects everyday movement. People with a history of joint problems or recent injuries should obtain appropriate guidance before starting high-impact training.
Conclusion: Build Speed With Quality, Not Just More Jumps
Plyometric exercises for speed at home can be a practical way to train explosive movement without a gym. Options such as squat jumps, low forward hops, broad jumps, and lateral drills allow you to practice different movement directions with minimal equipment.
The most useful routine is not necessarily the hardest one. Choose exercises you can control, keep the number of quality repetitions manageable, and progress only when you recover well. Combine plyometrics with suitable strength work and running practice if speed is your main goal.
Start with the simplest version that matches your ability. Track your movement quality as well as your performance, and make changes gradually. Consistency and sound technique provide a better foundation than chasing exhaustion or attempting advanced jumps too early.
Author Note
Written for readers who want a practical introduction to speed-focused training at home. Exercise suggestions are general educational information and should be adapted to individual fitness, experience, and physical needs. Any first-person account should be added only if it reflects the author’s genuine experience.
Medical Disclaimer
This article is for general educational purposes and is not a substitute for medical advice, diagnosis, or treatment. Speak with a qualified healthcare professional before starting a new exercise program if you have a medical condition, a recent injury, unexplained pain, or concerns about whether impact-based exercise is suitable for you.
Fitness Disclaimer
Plyometric training can involve rapid force production and repeated impact. Your appropriate exercise selection, intensity, and volume depend on your training history, technique, and recovery. Stop if you experience sharp pain, dizziness, unusual shortness of breath, or loss of control. Do not attempt advanced jumps without building the necessary skills and physical readiness.
Sources
- Effects of Plyometric Training on Physical Performance: An Umbrella Review—Sports Medicine—Open (2023)
- Systematic Review and Meta-Analysis on Plyometric vs. Resistance Training for Lower-Limb Explosive Power and Speed — PubMed (2025)
- Acute Effects of Plyometric Conditioning Activities on Sprint Performance: A Systematic Review and Meta-Analysis — Frontiers in Physiology (2026)
- Plyometric Training Enhances Jump, Sprint, and Agility Performance Across Different Surface Types — PubMed (2025/2026)
- The Effects of Plyometric Training on Sprint Performance: A Meta-Analysis — Journal of Strength and Conditioning Research
Related Articles
- 10 Best Core Exercises for Beginners at Home: Build a Stronger Core Without Equipment
- The Science Behind Weight Loss: Debunking Myths
- The Power of Movement: How Functional Fitness Training Boosts Strength and Longevity
- 12 Significant Aging Effects on the Brain
- 10 Causes of High Blood Pressure & Treatment
- Active Living
- 10 Best Exercises to Lose Belly Fat







[…] 12 Plyometric Workouts for Speed: Explosive Exercises to Boost Performance […]
[…] 12 Plyometric Workouts for Speed: Explosive Exercises to Boost Performance […]
[…] 12 Plyometric Workouts for Speed: Explosive Exercises to Boost Performance […]
[…] 12 Plyometric Workouts for Speed: Explosive Exercises to Boost Performance […]
[…] 12 Plyometric Workouts for Speed: Explosive Exercises to Boost Performance […]